Table of Contents
The Assign Student Activities page enables digital activity management and visibility into student progress in the One95™ platform.
Access the Assign Student Activities page by selecting Activities from the navigation panel.
95 Phonics Lesson Library™ 2.0
If your district has the 95 Literacy Intervention System™ (LIS) and 95 Phonics Lesson Library 2.0 (PLL 2.0) enabled in the One95 platform, the PLL 2.0 dashboard via the Assign Student Activities page will be available.
PLL 2.0 is an evidence-based program that enables educators to provide targeted, explicit intervention instruction for each student’s unique needs. Lessons include routine-based instruction and built-in practice opportunities spanning 75 discrete subskills across three levels: Basic, Advanced, and Multisyllable.
Contact your main district contact to learn more about PLL 2.0.

Assign Student Activities Overview
The Assign Student Activities page is the educator dashboard for PLL 2.0 digital activity assignments that provides a real-time record of students' progress. Educators can assign digital activities, known as Student Activity Modules or SAMs, as a digital alternative to using physical manipulatives within each day of the five-day lesson.
SAMs can be dynamically assigned to one or many students in each educator’s class or care for small-group instruction. The assignments made here determine which SAMs students can access within the One95 student app, known as the student flipbook. The student flipbook houses students' assigned SAMs.
This page surfaces SAM completion data, providing educators with visibility into students’ progress through assigned activity modules. Users can drill down into each student’s data and view their SAM completion status, session insights, and progress monitoring results across skills.
Individual student results can be printed and shared with stakeholders who may not have access to One95, empowering educators to drive data-informed decisions.
All LIS users with PLL 2.0 enabled in their school can access this page to assign or unassign SAMs and track student progress.
Data Visibility
Student data visibility within the Assign Student Activities page is driven by the scope of student data permitted to be displayed and accessed by each role.
Students
Each user can either view their rostered and group-assigned students or all the students in the school.
Groups
Each user can view the groups they lead.
Skill Table
The skill table within the Assign Student Activities page allows educators to manage SAM assignments and view students' progress.

Read the subskill results horizontally to view each student’s progression.
Students Column
The leftmost STUDENTS column displays the names of students available to you based on your role.
By default, the list of students is sorted alphabetically by last name and then alphabetically by first name. Clicking the STUDENTS column sorts students by name in ascending or descending alphabetical order.
The number of students displayed is indicated by the number next to the column name. A maximum of 50 students are shown at once.
If additional students remain in the classroom, click Show More Students at the bottom of the page to display the next or remaining set of students.
Contact your main district contact if you cannot view students in your class or group.
Flipbook Status
Each student’s real-time flipbook status is displayed below their name.
There are three statuses to help educators track students' flipbook engagement: Active Now, Last Active, and Hasn't Logged In Yet.

Active Now: This status indicates that the student is currently active or has been active in the flipbook within the last three minutes.

Last Active: This status indicates that the student is not currently active in the flipbook but has previously been active. The date on which they were last active is displayed in MM/DD/YYYY format.

Hasn’t Logged In Yet: This status indicates that the student has not yet logged in to the flipbook.
View Details
Click the View Details button below each student's name to drill down into the student's skill progress.
Reference the "Skill Summary" section of this article to learn more.
Group Column
View each student’s group participation in the GROUP column. This column appears empty if the student is ungrouped.
Students can participate in up to three groups concurrently: one Classroom group, one Tier 2 group, and one Tier 3 group.
If the student is involved in more than one group, the groups will be displayed in the following order: Tier 2 group, Tier 3 group, and Classroom group.
Each group's icon and name are displayed. Note that groups may not have been assigned icons during creation.
Subskill Columns
The table columns represent the subskills related to the skill selected in the Skip to drop-down. Select from Skill 2 through Skill 15. Only one skill can be viewed at a time.
Skill 2 is displayed by default. The columns are labeled 2.1 through 2.6. for each subskill.

A subskill is the unit to which you can assign students for literacy practice from the Assign Student Activities page when the 95 Phonics Lesson Library 2.0 tab is selected.
Scroll up and down using your mouse and sideways using the table’s arrow icons to view all subskills and student progress.
Subskill Progress
By default, student rows within collapsed columns are empty, indicating that subskills have not been assigned.
As students progress through intervention, student rows within collapsed columns may reflect one of two icons.

- Green circle icons indicate that the subskill is currently assigned.

- Checkmark icons indicate that the subskill was previously assigned, and the student completed at least three SAMs.
Hover over the Info Key button to reference the column icon criteria at any time.
Drill down and expand current and previous subskill progress by clicking the triangle icon in the bottom right-hand corner of the subskill columns. This shows each student’s subskill progress in a day-by-day breakdown.
Click the column header to hide the subskill progress. Only one subskill can be viewed at a time.
After expanding a subskill column, the full subskill name is displayed in the column header.

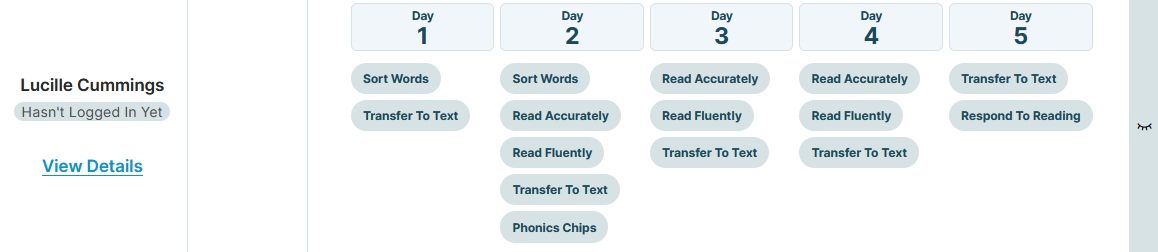
Day Columns
Within each student row, there are five columns labeled DAY 1 through DAY 5, with each column representing one of the five lesson days. The columns list the SAMs available for that day.
Students must reach the designated milestones within their assigned SAMs for the activity to be considered complete. SAM colors are an indicator of the student’s activity status.

- Gray SAMs indicate that the activity has not been opened.

- Navy SAMs indicate that the activity has been opened but not completed.

- Green SAMs indicate that the activity has been completed.
Hover over the Info Key button to reference the SAM color criteria at any time.
To learn more about the SAM completion criteria, reference our article on PLL 2.0 SAM Completion Criteria.
SAM Previews
It is advisable to model the SAMs to walk students through the functionality when they are used for the first time.
Although the Teacher Presentation Files (TPFs) illustrate the activities for the “I Do” and “We Do” stages of each lesson and closely mimic the SAMs, they do not capture the specific steps for completing the digital activities, such as dragging and dropping the phonics chips or using the SAM menu icons.
Click the ellipsis icon within an expanded subskill column to preview the related SAMs.

Once Preview Student Activity Module has been selected, the day-by-day breakdown will be displayed in a new browser tab.
Select a day tile to view the SAMs related to each lesson day.

SAMs will be displayed as tiles. Select a SAM tile to open the activity.

Click START to launch the SAM.

To preview other SAMs, users must close the tab to return to the Assign Student Activities page and repeat the workflow. The home icon is disabled during SAM previews.
Note:
- Activity progress and completion data will not be saved.
- The student flipbook cannot be accessed from the Assign Student Activities page.
To learn more about navigating SAMs, reference our article on PLL 2.0 Student Activity Modules.
Table Filtering
By default, the skill table reflects the subskills related to Skill 2. Users can alternate between skills by using the Skip to drop-down above the table.
The list of students displayed can be filtered by grade, active groups, and name to streamline subskill assignments and progress review.

If your district has Sortegories™ enabled, toggle between the PLL 2.0 and Sortegories dashboards using the tabs at the top of the page.
To learn more about navigating Sortegories from the Assign Student Activities page, reference our article on Assign Student Activities Page: Sortegories.
Students
To locate a student, scroll through the list of students or use the filtering options available above the skill table.
Filters can be used in conjunction with one another and the search bar. Leverage as many or as few filters as necessary.
Click the X icon within the selected grades and/or groups and the search bar to clear the filters.
Grade
Use the Grades drop-down to filter the students displayed within the skill table by grade.
Mark the checkboxes next to one or multiple grades. Click Done once complete.
Note: The available grades are synchronized with your district’s rostering platform.
Group
Use the Groups drop-down to filter the students displayed within the skill table by the groups you lead.
Mark the checkboxes next to one or multiple groups. Click Done once complete.
Note: The Groups drop-down will be hidden if users are not associated with at least one active group.
Teacher
Use the Teachers drop-down to filter students by classroom teacher.
Mark the checkboxes next to one or multiple teachers. Click Done once complete.
Student Name
Use the Students Name search bar to filter students by first and/or last name.
Subskill Assignments
Educators can manage subskill assignments from the skill table at any time.
These settings determine which subskills are available for each student within the One95 student flipbook.

Assigning Subskills
Subskills can be individually assigned or assigned to all students in the classroom at once after clicking the triangle icons and expanding the subskill columns.

Individual Assignments
The closed-eye icon within a student’s row indicates that the subskill is not assigned to the student. 
To individually assign a subskill, click the closed-eye icon within the student’s row.
After selection, the closed-eye icon will be replaced by an open-eye icon highlighted in green, indicating the subskill is available for practice in the student's flipbook.
Bulk Assignments
The closed-eye icon within a subskill column indicates that the subskill is not assigned in bulk. 
To assign a subskill to all students displayed in the table, click the closed-eye icon within the desired subskill column.

Click Yes, Please Continue to confirm.
After selection, the closed-eye icons will be replaced by open-eye icons highlighted in green, indicating the subskill is available for practice in the students’ flipbooks.
Unassigning Subskills
Subskills can be unassigned from students individually or unassigned from all students in the classroom at once after clicking the triangle icons and expanding the subskill columns.
Individual Assignment Removals
The open-eye icon within a student’s row indicates that the subskill is assigned to the student. 
To individually unassign a subskill, click the open-eye icon in the student’s row.

After selection, the open-eye icon will be replaced by a closed-eye icon, indicating the subskill is no longer assigned to the student and has been removed from their flipbook.
Bulk Assignment Removals
The open-eye icon within a subskill column indicates that the subskill is assigned in bulk. 
To unassign a subskill from all students displayed in the table, click the open-eye icon within the desired subskill column.

Click Yes, Please Continue to confirm.
After selection, the open-eye icons will be replaced by closed-eye icons, indicating the subskill is no longer assigned to the students and has been removed from their flipbook.
Hover over the Info Key button to reference the eye icon meanings at any time.
Automatic Assignment Removals
Subskills are automatically unassigned after being assigned to students for 21 calendar days. This helps educators manage active subskill assignments and ensures students have a limited number of subskills available in their flipbooks.
Once 21 calendar days have passed, the subskill assignments within the Assign Student Activities page will reflect that they have been unassigned via closed-eye icons, meaning students can no longer access the related SAMs within their flipbook.
Educators can reassign subskills at any time.
Skill Summary
To drill down into students’ skill progress, click View Details below the student’s name in the STUDENTS column.
This view provides a summary of the student’s subskill progression across one or more skills.

The skill summary is organized by section, with each section representing one of the student's assigned subskills.
Scroll up and down using your mouse to view progress across all subskills.
Skill Summary Header
The header at the top of the skill summary displays the selected student and the skill associated with the subskill they were last assigned.
If students have not been assigned a subskill, Skill 2 will be shown by default, and the module summary will indicate that there is no progress data.
The module summary header formatting is as follows: [Student First Name + Last Name]: Skill [Skill Number] Summary (e.g., Maude Armstrong: Skill 2 Summary).
Alternate between skills using the Skip to drop-down. Select from Skill 2 through Skill 15. Only one skill can be viewed at a time.
Progress Monitoring
Students should be monitored for progress to determine skill proficiency and ensure they are responding to the intervention.
It is advisable to follow a three-week (i.e., 14-17 days) intervention cycle. During week three of the cycle, Phonics Screener for Intervention™ (PSI) diagnostic assessments can be administered to the students in each intervention group for progress monitoring. PSI identifies when students are ready to transition from one skill to the next.
The student’s eight most recently completed and saved PSI results related to the selected skill will be displayed for visibility, streamlining subskill assignments.
Each assessment will display the form used (i.e., A, B, C), the administration date in MM/DD/YYYY format, and the nonsense words (i.e., pseudowords) and sentences score.

- Skills P2 through P9 are tested in two parts: nonsense words and sentences containing skill-based pattern words.
- Skill P10 through P15 tests nonsense words.
Nonsense words ensure that students have the decoding skills to pronounce the word and are not relying on memory.
Score colors are an additional indicator of the student’s mastery.
- Green scores represent a mastery of 90% or better.
- Yellow scores represent a mastery of 70-89%.
- Red scores represent a mastery of below 70%.
Subskill Sections
Depending on the student's subskill assignments, the skill summary consists of one or more subskill sections in descending numerical order.
These sections capture the student’s subskill progress across the skill selected in the Skip to drop-down at the top of the skill summary.
The subskill name and number are displayed at the top of each section.
Subskill Assignee
The first and last name of the subskill assignee is displayed at the top of the subskill section.
If the subskill was assigned to the student multiple times, the name of the most recent assignee is displayed.
Day-by-Day Breakdown
The day-by-day breakdown is displayed below the subskill name. The five columns are labeled Day 1 through Day 5, with each column representing one of the five lesson days. The columns list the SAMs available for that day.
Students must reach the designated milestones within their assigned SAMs for the activity to be considered complete. SAM colors are an indicator of the student’s activity status.
- Gray SAMs indicate that the activity has not been opened.
- Navy SAMs indicate that the activity has been opened but not completed.
- Green SAMs indicate that the activity has been completed.
Hover over the Info Key button to reference the SAM color criteria at any time.
To learn more about the SAM completion criteria, reference our article on PLL 2.0 SAM Completion Criteria.
Session History
The table on the right-hand side of the subskill sections displays the student's 10 most recent sessions in which the subskill activities were opened.

- The Date column lists the dates the student logged in to the student flipbook in MM/DD/YYYY format.
- The Duration column lists the number of minutes the student was active within the session, even if the activity was not fully completed.
Table rows are sorted in ascending date order.
Note:
- Session data from the same day is combined. For example, if the student logged in three times in one day, the session date and duration will be displayed as a single row on the table.
- Durations are rounded up to the nearest minute. For example, if the student was active for 24 minutes and 15 seconds, the Duration column would outline 25 minutes.
Printing
The PRINT button at the bottom of the skill summary allows you to print the student’s record and obtain hard copies of the data.
This information can be used as supporting documentation for the student and shared with stakeholders who may not have access to the One95 platform.
For optimal printing formatting, ensure the Background graphics checkbox is marked in the printing settings of Google Chrome.
95 Percent Group Support is here to help! Contact us via the knowledge base support form.
To learn more about submitting tickets, reference our article on One95 Support.
Was this article helpful?
That’s Great!
Thank you for your feedback
Sorry! We couldn't be helpful
Thank you for your feedback
Feedback sent
We appreciate your effort and will try to fix the article