Reference our One95 Resource Assignments article for a license assignment quick-start guide.
Table of Contents
The Settings page’s Licenses tab enables viewing and allocating 95 Percent Group resource licenses to individual users and user groups within the One95™ platform.
One95 Administrators have exclusive access to the Settings page, where platform settings are configured. Access the Licenses tab by selecting Settings from the navigation panel and clicking Licenses in the menu at the top of the page.

License Assignments Video
Reference our One95 License Assignments Video article for a walkthrough on managing your district’s resource licenses.
Licenses Overview
There are two subtabs within the Licenses tab: Licensed Resources and Licensed Users.
Licensed Resources Subtab

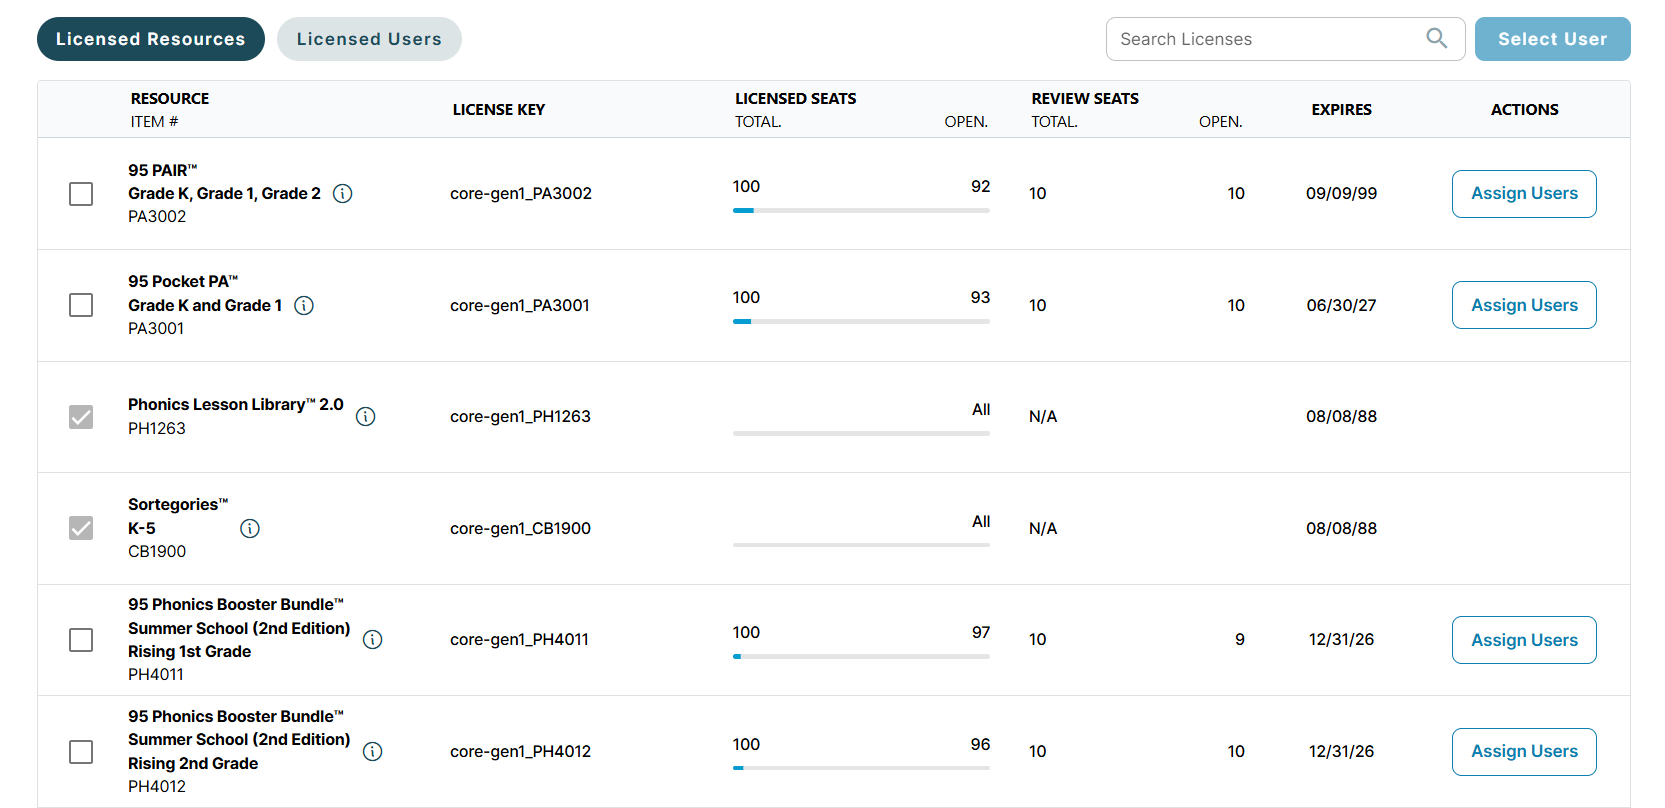
The Licensed Resources subtab provides visibility into your district’s licensed 95 Percent Group products, including available seats and expiration dates.
“Seats" in One95 represent individual users’ ability to access the product. There are two seat types for resource access: licensed and review. Both seat types offer identical product access.
Resource Column
The RESOURCE column lists both licensed and unlicensed products.
Certain products provide all-district access. Products with a grayed-out checkbox are assigned to all users in the platform by default.Hover over the tooltips to view product information.
License Key Column
The LICENSE KEY column displays the license's unique identifier.
Licensed Seats Column
The LICENSED SEATS column displays the total number of licensed seats available, alongside the number of open seats for licensed products.
As seats are assigned and unassigned, a blue progress bar dynamically visualizes how many licenses are assigned out of those available.

- Products showing zeros in this column are unlicensed.
- Products showing All in this column provide all-district access.
Note: The total number of licensed seats available for each product is based on your district’s order. Contact 95 Percent Group Support if your district’s purchased licensed seats are not reflected in One95.
Review Seats Column
The REVIEW SEATS column displays the total number of review seats available, alongside the number of open seats.
Review seats provide identical product access as licensed seats and allow interested users visibility into 95 Percent Group resources. Districts receive 10% of all purchased seats as complimentary review seats.
For example, if your district purchased 100 licensed seats for the 95 Phonics Core Program®, you receive 10% free review seats, meaning there are 10 review seats available for assignments.
Additionally, districts receive one free review seat for various unlicensed products to learn more.
Expires Column
The EXPIRES column displays the product’s expiration date.
Actions Column
The ACTIONS column displays an Assign Users button for seat management.
Products that provide all-district access are ineligible since they are assigned to all users in the district by default.
Reference the “License Management” section of this article to learn more.
Licensed Users Subtab

The Licensed Users subtab displays the One95 platform users rostered through your district’s rostering platform. Individual user roles are modified from here.
Reference each user’s One95 role within the Role column, their One95 status (i.e., active or inactive) based on whether they are actively rostered in your district’s rostering platform within the Status column, and product access levels in their row drop-downs.
Inactive users cannot log in to the platform. To learn more about inactive users, reference our article on Inactive Users.Click on the right and left arrow icons to advance the carousel forward or backward through your district's list of licensed resources.
To locate a user, scroll through the list or use the available filtering options. Leverage as many or as few filters as necessary.

- Filter users by their One95 platform role within the Role filter.
- Filter users by their school within the School filter.
- Filter users by their One95 status within the Status filter.
- Filter users by their grade within the Grade filter.
Use the search bar to filter by first or last name.
Filters can be used in conjunction with one another and the search bar.
Click the X icon within the drop-downs and search bar to clear the filters.
User Sorting
Sort users in ascending or descending alphabetical order by name or role by clicking the Users and Role columns, respectively.
Sort users by status in ascending or descending alphabetical order by clicking the Status column.
Page Display Settings
To adjust the number of users displayed in the table, click the Records per page drop-down at the bottom of the subtab and select a new number.
Reference the total number of users rostered into One95 next to this drop-down.
Navigate between pages by clicking on the previous and next page icons above the Update button. Jump to the first or last pages by clicking the first and last page icons, respectively.
Role Modifications
For districts without access to the 95 Literacy Intervention System™ (LIS), every district role is mapped to the Teacher role during the initial One95 platform configuration.
For districts with access to the LIS, every district role is mapped to the One95 role to which most of your district’s users need access.
One95 Administrators can modify these permissions and individually update user roles within the Licensed Users subtab.
To update a user’s role assignment, click on their name within the Users column.
Select the new role from the modal. For example, to upgrade a Teacher to a One95 Administrator, click Administrator.
Districts with access to the LIS can select from various roles, including custom roles, depending on their configuration within the Settings page’s Roles tab.
It is important to enable the Sticky toggle after selecting the role.
The Sticky toggle overrides the default role mapping within the Settings page’s Connect tab. This means the user’s role will remain unchanged during a manual or nightly re-roster. If the toggle is disabled, they will only have their role privileges until the next re-roster.
Click Save once the role has been selected, and the Sticky toggle is enabled.
To finalize the user’s role assignment, click Update once complete.
License Visibility
To view a snapshot of the products currently assigned to an individual user, click the ellipsis icon next to the user’s role within the table.

The user’s name, school(s), grade(s), and One95 role are displayed at the top of the modal.
Each resource that is actively assigned to the educator is outlined in the table. The table will be empty if the user has no resources assigned.
- The License Key column displays the license's unique identifier.
- The Product column displays the user’s assigned 95 Percent Group resources. It outlines the product key, product line, and product level.
- The License Type column displays the license type: licensed, review, or all-district license.
- The Product Type column indicates whether the product is a paid subscription (i.e., subject to expiry) or a perpetual product (i.e., not subject to expiry).
- The License Start column displays the date on which product access began.
- The License End column displays the date on which paid subscriptions end.
Click the Print button at the bottom of the modal to print the user’s license information.
License Management
Available licensed and review seats can be assigned, unassigned, and reassigned at any time.
There are two places to manage resource assignments: the Licensed Resources subtab and the Licensed Users subtab.
It is advisable to follow the Licensed Resources workflows for the best user experience.1. Licensed Resources
The Licensed Resources subtab is the streamlined hub for managing resource access to educators across the district.
To manage seat assignments for a given product, click the Assign Users button in the product row.
Use the search bar to locate resources as needed.
The Manage Users and Seats modal will be displayed.

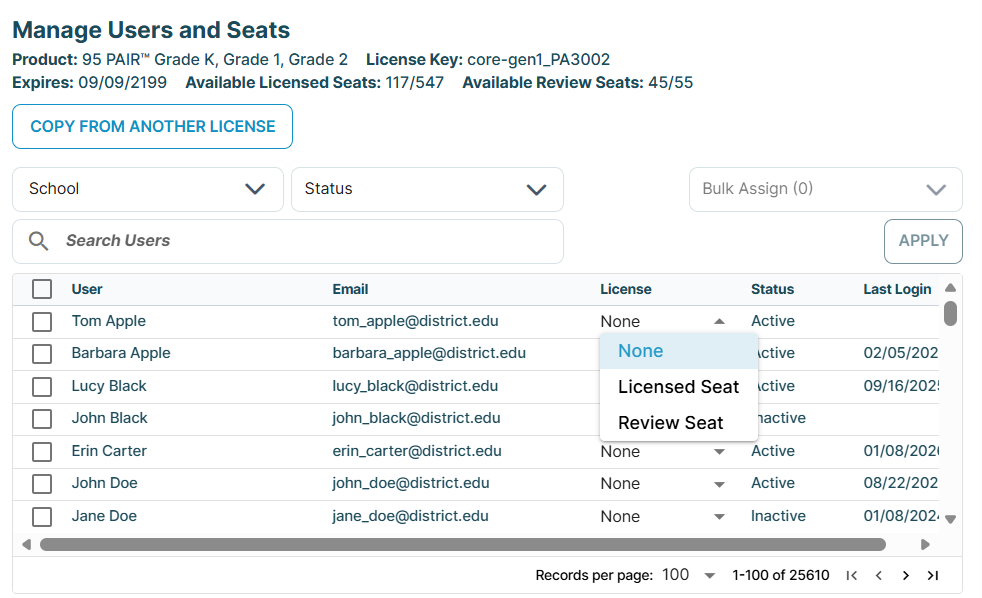
The product name, license key, expiry date, and available seat counts are displayed at the top of the modal. As resources are assigned or unassigned, the seat counts update to reflect the number of open seats. Assignments cannot be completed if there are not enough open seats.
All users rostered through the district's rostering platform are listed in the table, sorted alphabetically by last name.
Use the School and Status drop-downs to filter users by school or One95 status (i.e., active or inactive), and the search bar to filter by name or email address.
There are three resource assignment workflows: individual assignments, bulk assignments, and copying license assignments from another product.
Individual Assignments
To individually assign a license, click the License column drop-down in the user's row.

- Click Licensed Seat to assign a licensed seat.
- Click Review Seat to assign a review seat.
Complete this workflow for each user as needed.
Click Save Changes to save the assignment(s).
Users must log out and back in to access newly assigned resources.
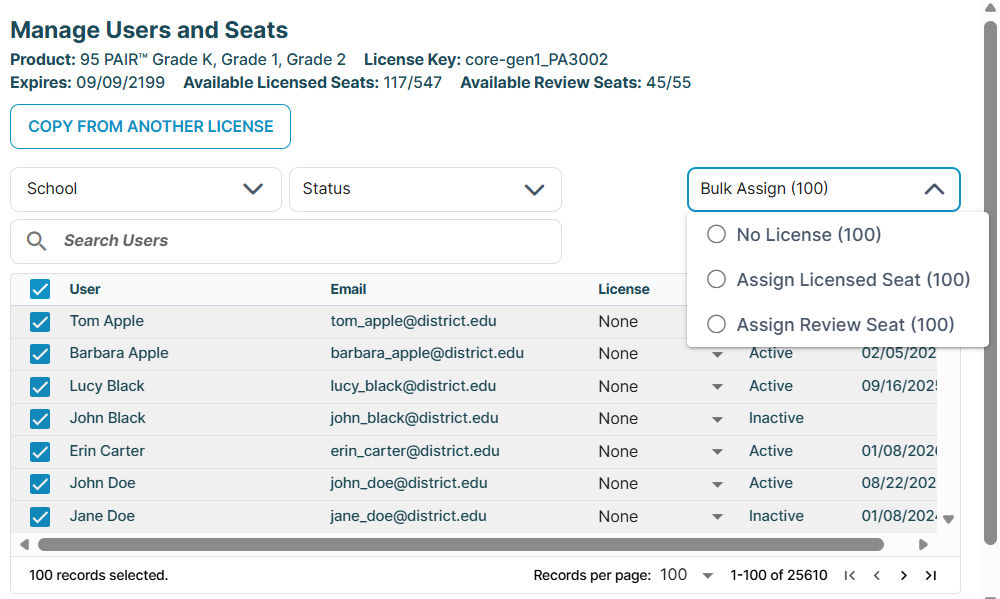
Bulk Assignments
To assign licenses in bulk, mark the checkboxes next to the desired users individually or mark the checkbox in the table header to select all displayed users.
It is advisable to consider using the School filter to display all users from a given school before assigning resources in bulk.Then, click the Bulk Assign drop-down next to the search bar.

- Click Assign Licensed Seat to assign a licensed seat.
- Click Assign Review Seat to assign a review seat.
Click the APPLY button to update the License column for all selected users. From here, access levels for each user can be modified by clicking on the License column drop-down and selecting a new option (e.g., None) as needed.
Click Save Changes at the bottom of the modal to save the assignments.
Users must log out and back in to access newly assigned resources.
Copying Assignments
To copy the assignments from another product, click the COPY FROM ANOTHER LICENSE button.
This displays all licensed products, sorted alphabetically, and the number of assigned licensed and review seats for each one.
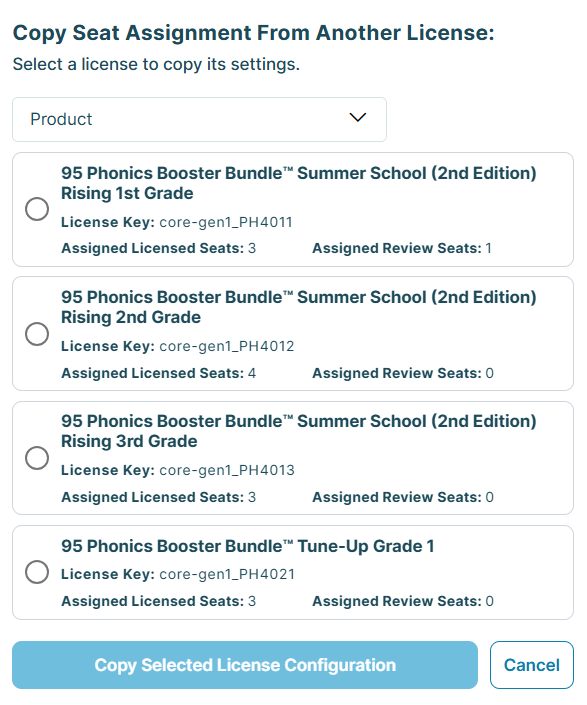
Use the Product drop-down to filter the list by individual products.
Select a product before clicking Copy Selected License Configuration to copy the product's seat assignments and update the License column for all impacted users.
From here, access levels for each user can be modified by clicking on the License column drop-down and selecting a new option as needed.
Click Save Changes at the bottom of the modal once complete.
Users must log out and back in to access newly assigned resources.
Unassigning Resources
Once a licensed or review seat is provisioned, resources can be unassigned from the Licensed Resources subtab.
To unassign a resource individually or in bulk, start by clicking the Assign Users button in the row of the product you would like to deprovision from the ACTIONS column.
To individually unassign a resource, click the License column drop-down in the desired user's row before selecting None.

To unassign a resource in bulk, mark the checkboxes next to the desired users individually, or mark the checkbox in the table header to select all displayed users.
Then, click the Bulk Assign drop-down next to the search bar. Select No License before clicking APPLY.
Click Save Changes once complete.
This removes the product from the Resources pages of one or many users and opens the licensed and/or review seats for others.
Reassigning Resources
The steps for reassigning open seats are identical to assigning them.
To reassign a license, click the License column drop-down in the desired user’s row.
- Click Licensed Seat to assign a licensed seat.
- Click Review Seat to assign a review seat.
Complete this workflow for each user as needed.
Click Save Changes to save the assignment(s).
Users must log out and back in to access newly assigned resources.
2. Licensed Users
To manage resource access, start by marking one or many checkboxes next to the products you would like to manage in the Licensed Resources subtab.

Use the search bar to locate resources as needed.
Once the products have been selected, click the Select User button in the upper right-hand corner of the subtab.
You will arrive at the Licensed Users subtab. The table displays the product(s) available for license assignments.

If more than two product checkboxes were marked, click on the right and left arrow icons to advance the carousel forward or backward through the list of resources.
Scroll through the list to find the user to whom you would like to assign the resource(s) or use the filtering options available.
Combine filters for bulk assignments. For example, combine the school and grade filters to display all users from a given school associated with a given grade.
Individual Assignments
To individually assign a license, click the drop-down below the product in the user's row.

- Click Licensed Seat to assign a licensed seat.
- Click Review Seat to assign a review seat.
Complete this workflow for each user and/or product as needed.
Click Update to save the assignments.
Users must log out and back in to access newly assigned resources.
Bulk Assignments
To complete bulk assignments, mark the All checkbox next to Licensed seats open or Review seats open to assign the resource to every user within the filtered list.
Note: Bulk assignments cannot be completed if there are not enough open seats.

The drop-down selection for each user will update to either Licensed Seat or Review Seat.
Click Update to save the assignments.
Users must log out and back in to access newly assigned resources.
Unassigning Resources
Once a licensed or review seat is provisioned, product assignments can be removed by selecting Not Assigned from the drop-down alongside the assigned user.

This removes the product from the user’s Resources page and opens the seat for another user.
Reassigning Resources
To reassign a license, click the drop-down below the product in the user's row.
- Click Licensed Seat to assign a licensed seat.
- Click Review Seat to assign a review seat.
Click Update once complete.
Frequently Asked Questions (FAQ)
How can I view which licenses are allocated to each user?
One95 Administrators can run a report from the Settings page's Activity tab to view active license assignments across the district.

Access the Activity tab by selecting Settings from the navigation panel and clicking Activity in the menu at the top of the page.
From here, select User Licenses from the Activity Type drop-down.
Click Export. The file will be downloaded locally.
To view license allocations by product, sort by product or by user in the report.Do product assignments carry over between school years?
Yes.
How are substitute teachers added to One95 for resource access?
Substitute teachers must be added to your district’s rostering platform and shared with One95 to access resources.
Once rostered and synchronized into the platform, seats can be moved around to provide the substitute with temporary product access. Seats cannot be assigned unless the substitute is rostered into One95.
Depending on whether they are a long-term or short-term substitute teacher, licensed and review seats should be assigned, respectively.
To learn more about substitute teacher access, reference our article on One95 Substitute Teacher Access.
Why do I see unlicensed products?
By default, the Licensed Resources subtab displays many products available from 95 Percent Group, even if your district has not licensed them.
Districts receive one free review seat for various unlicensed products to learn more.
How many seats accompany my product? How do I know how many are open?
The number of seats your district purchases determines the number of available seats that accompany your products.
Reference the total number of purchased seats (i.e., the left-hand number) and the number of available seats (i.e., the right-hand number) within the LICENSED SEATS column of the Licensed Resources subtab.
A blue progress bar visualizes how many licenses are assigned out of those available.

What is a review seat?
Review seats provide the same product access as a licensed seat and allow interested users visibility into 95 Percent Group resources.
Districts receive 10% of all purchased seats as complimentary review seats. Additionally, districts receive one free review seat for various unlicensed products.
What is the difference between a licensed and a review seat?
Licensed seats are purchased, whereas review seats are complimentary. Both seat types offer identical product access.
Can I move seats around?
Yes. Seats can be assigned, unassigned, and reassigned at any time.
Unassigning a seat opens the seat for another user, which can be reassigned immediately.
How do I find one of my users?
To locate a user, scroll through the list or use the filtering options at the top of the Licensed Users subtab. Leverage as many or as few filters as necessary.

- Filter users by their One95 platform role within the Role filter.
- Filter users by their school within the School filter.
- Filter users by their One95 status within the Status filter.
- Filter users by their grade within the Grade filter.
Use the Search Licensed User search bar to filter by first or last name.
Sort users in ascending or descending alphabetical order by name or role by clicking the Users and Role columns, respectively.
How can I preview a product?
Districts can assign review seats for product previews.
Once review seats are assigned, users must log out and back in to access newly assigned resources.
95 Percent Group Support is here to help! Contact us via the knowledge base support form.
To learn more about submitting tickets, reference our article on One95 Support.
Was this article helpful?
That’s Great!
Thank you for your feedback
Sorry! We couldn't be helpful
Thank you for your feedback
Feedback sent
We appreciate your effort and will try to fix the article